- Heat the milk to about 90 degrees F. (Cow temperature less a few degrees that the dairy maids would have lost in transport anyway.
- Infect the milk with some cultured buttermilk. (mesophilic lactobacillus) These would have been native to the cow's teats and since the period milk wouldn't have been pasteurized, the bacteria wouldn't have needed to have been re-added. (Wait 60 minutes for the bacteria to get going in the new environment.)
- Here's where we start picking up the period steps. We add our rennet. I did not use Markham's rennet recipe, because I think it's nasty. I used double strength vegetable rennet. Not period, but chemically very similar to calf rennet, which I have also used. Very little difference in final product.
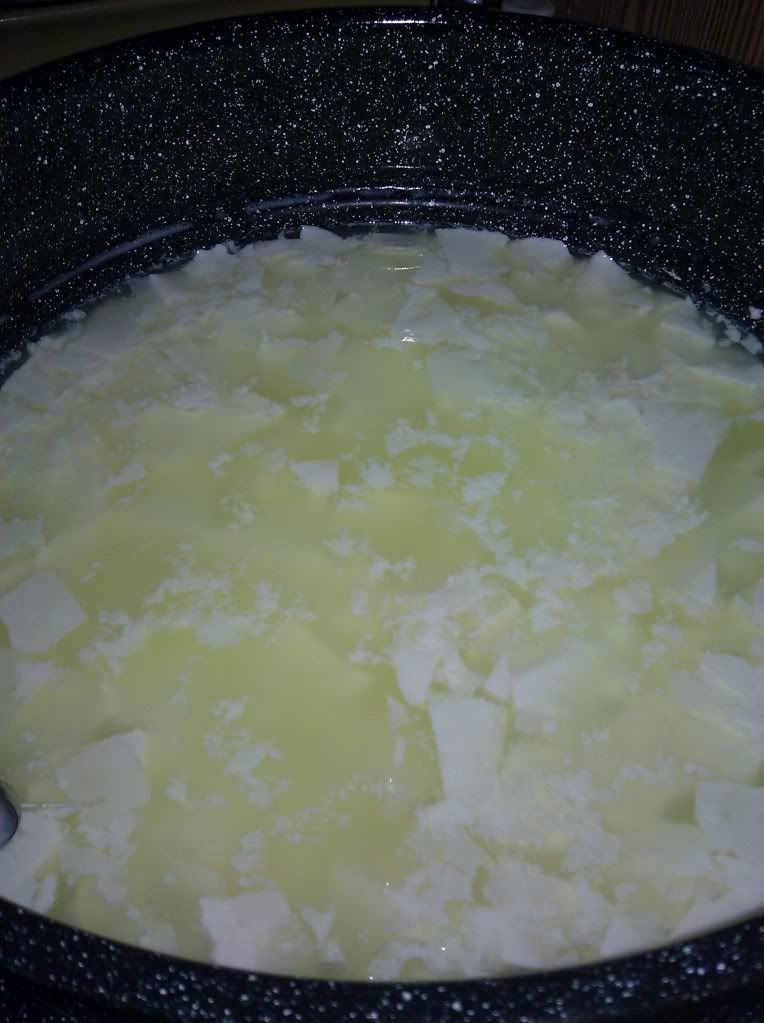
Hand stirred curd. - After 45 minutes, I cut the curd. After cutting it, I gave it 15 minutes to heal, and then I gave it a stir with my bare, washed hand.
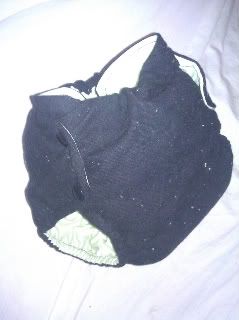
- Then my instructions said to let the curd settle and press it to the bottom of the pot with my hands, and then scoop off as much whey as possible with a shallow dish. This seemed horrendously inefficient (typical non-cooking-person cooking instructions), so I placed a piece of sterilized cheese cloth on top of the curd, and scooped out the whey that seeped through the cloth. It's MUCH easier to do this way without losing curd. The picture shows what my curd looked like after I'd scooped off about a gallon of whey - which I set aside for a dessert experiment... (Chocolate brunost, per Deja's request.)
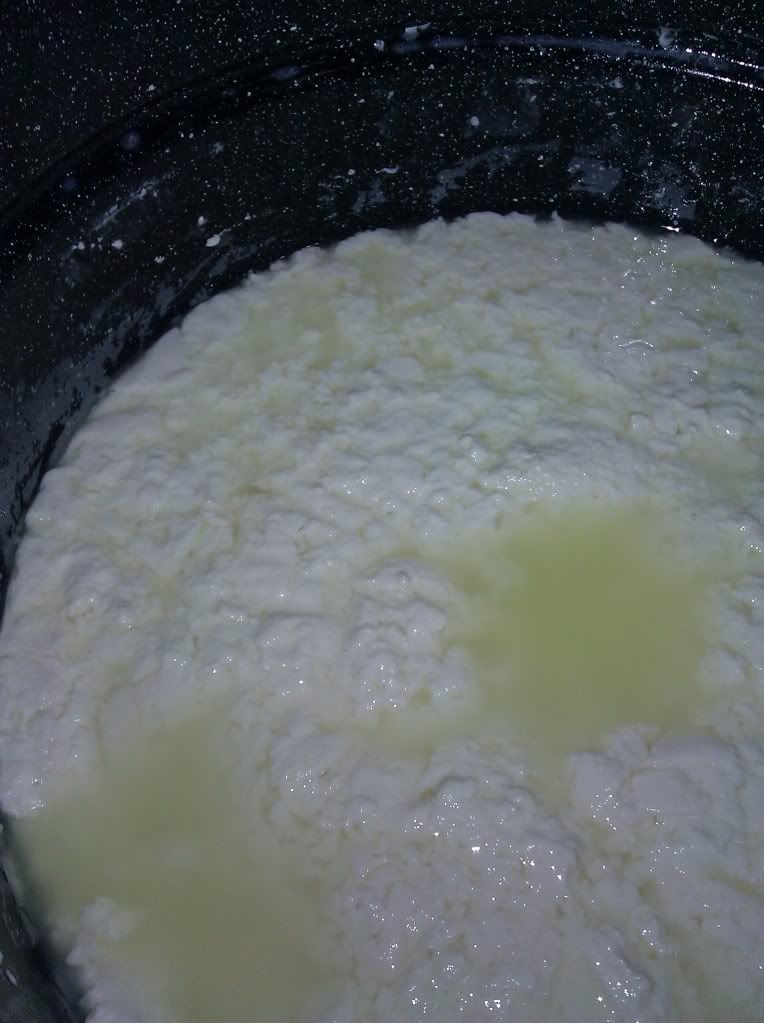
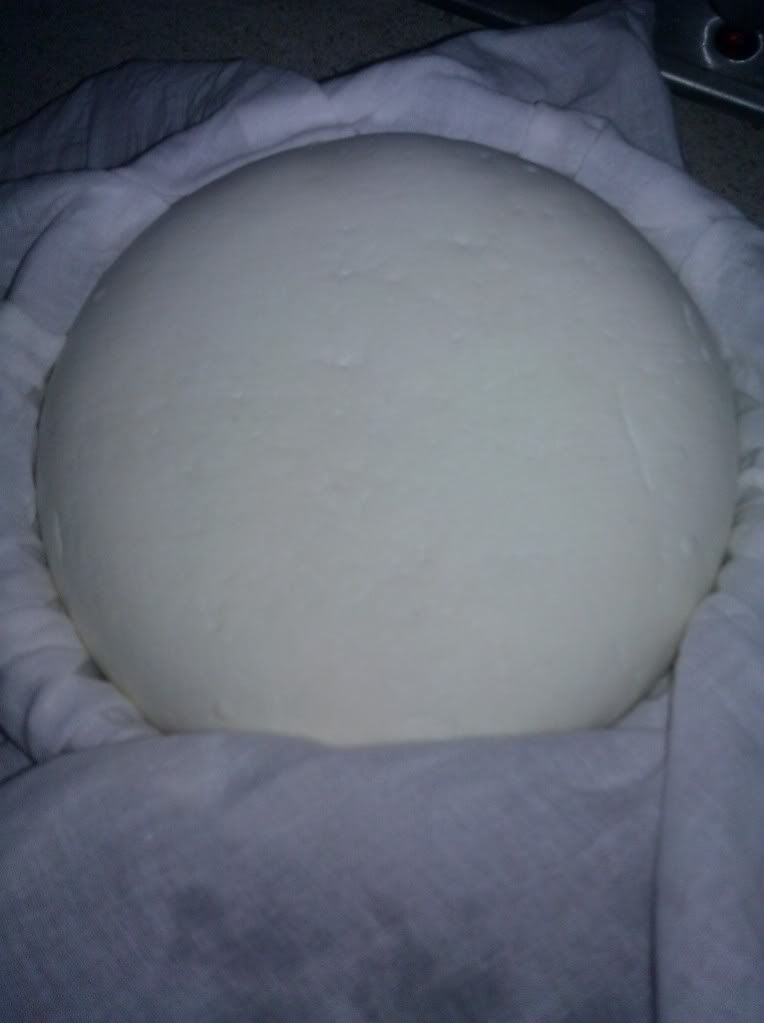
Curd mass after light pressing
by hand - The next step involved carefully scooping the curd mat into the "mold" and pressing it under a light weight. I scooped the curd mat into a piece of cloth on a screen strainer, because I didn't have a basket to scoop my curd into as the initial mold. I folded the cloth over the top of the curd and pressed it gently but firmly with my hands. After about 30 minutes of fussing, the curd was much more firm and ready for the press.
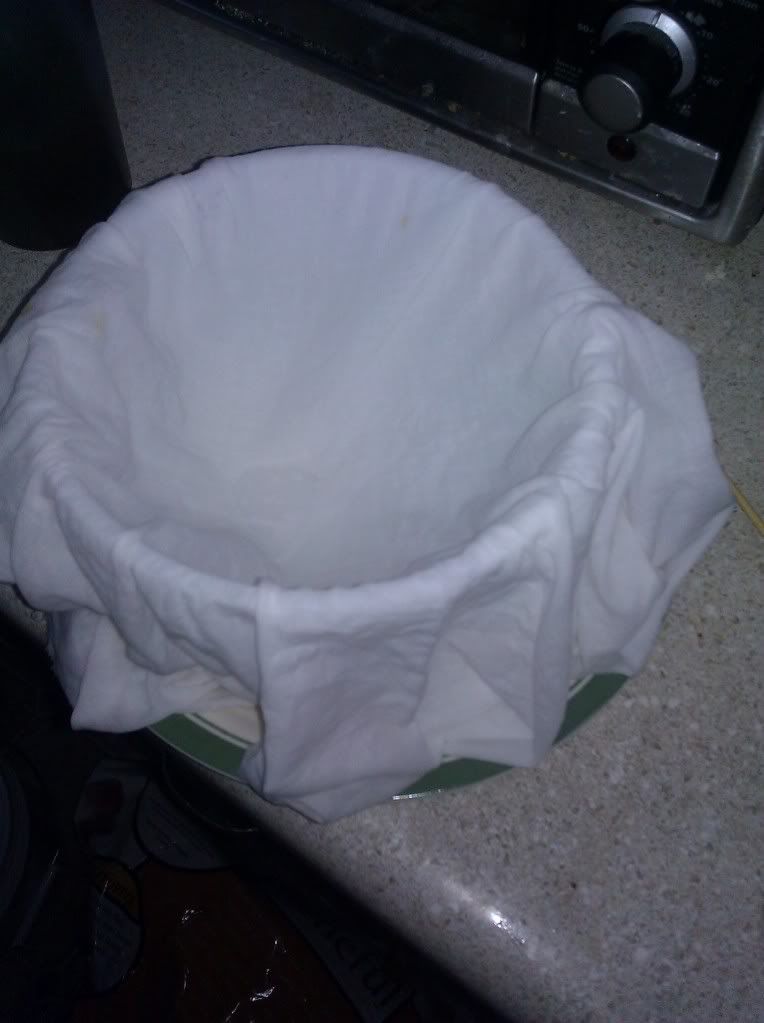
Mould lined with damp
cloth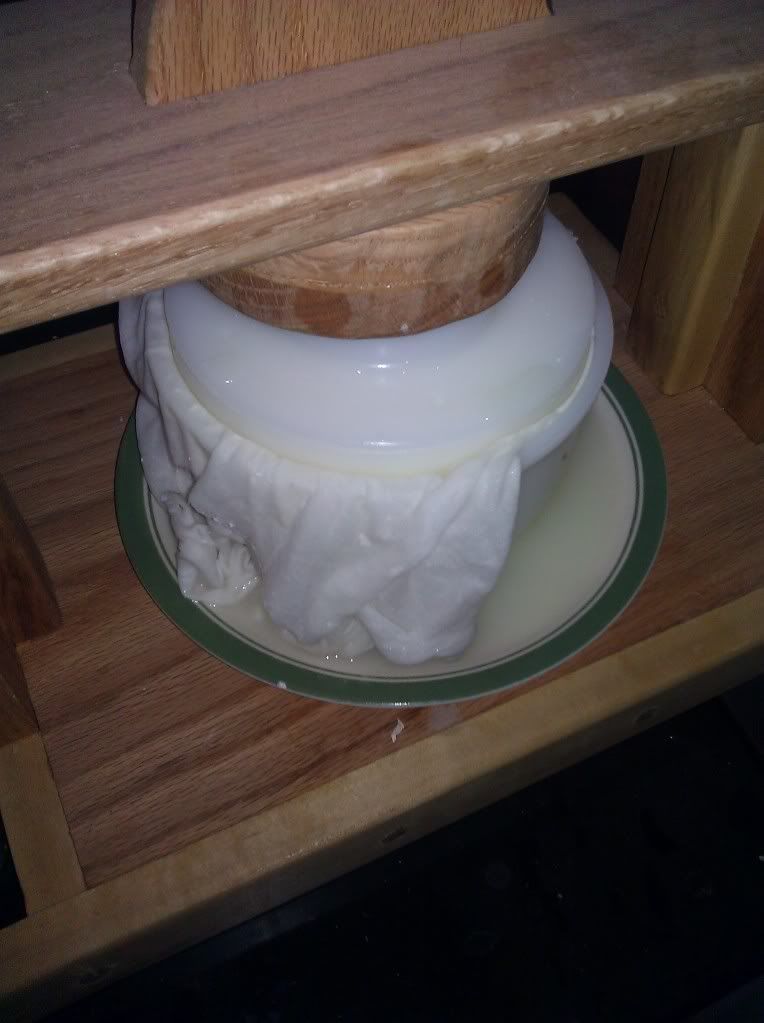
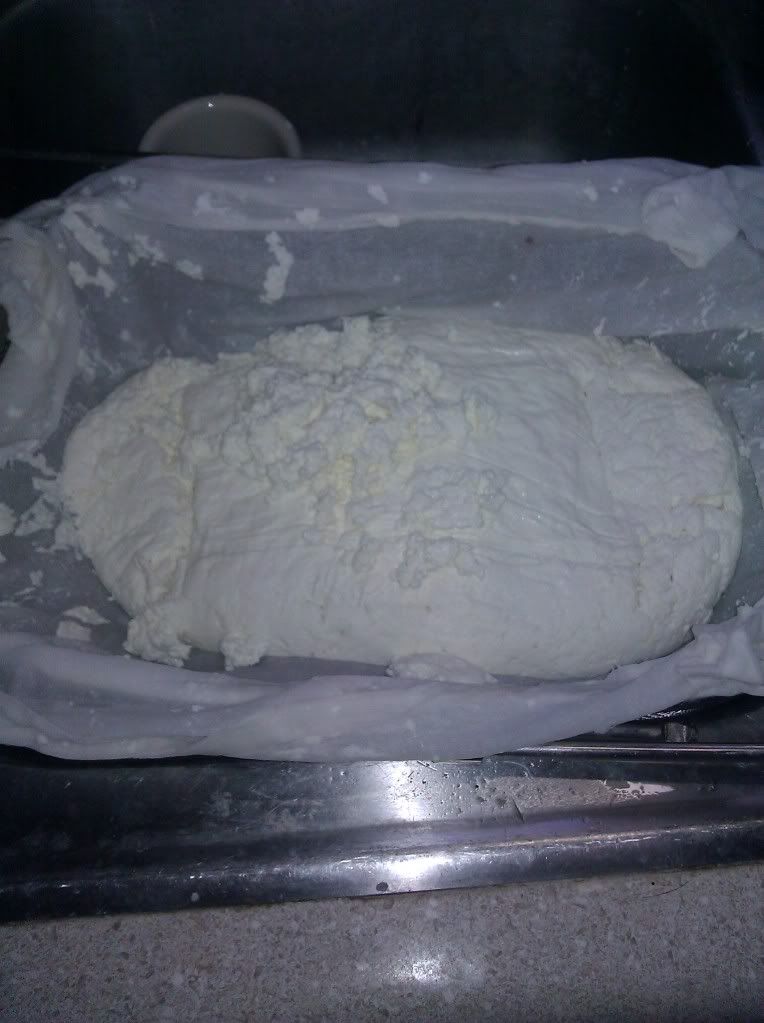
Mould with curd in the
press - Then my directions say to turn out the curd into a clean cloth that has been dampened with cool water and press it in my big press. Here are the mould dressed with a wet cloth, and the curd in the great press:
Curd flipped into a new
dry cloth. - Following these steps, I am meant to wait for 30 minutes, and then turn out the curd into a dry cloth and return it to the press. This cloth should be exchanged 5-6 times for a new clean, dry cloth in the next 24 hours, each time the cheese is flipped and returned to the press.
- Tomorrow, I shall return the cheese to the press in the mold with no cloth and leave it there for about twelve hours.
- After I remove the cheese from the final pressing, I need to rub it in salt and start the curing process...
Saturday, November 5, 2011
Markham's Cheese In Practice:
Everything starts out "normal" with this cheese... Which is to say that we have to do a couple of steps to bring pasteurized milk back to a state similar to the one that Markham's milk maids would have gotten from milking a cow and taking milk directly to the dairy.
Thursday, November 3, 2011
Period Apples:
Rosemarion sent me some period apples from an orchard near her that specializes in them! Last night, I finally got 'round to coring and deworming them so that they can eventually be pressed into cider and made alcoholic.
 The flavor of these apples was similar to that of a MacIntosh or crab apple, but less tart than the MacIntosh and sweeter than crab apple. The meat of the apples was a bit peculiar in that it looked in many places as though the core wasn't sure it wanted to be contained to the center of the fruit.
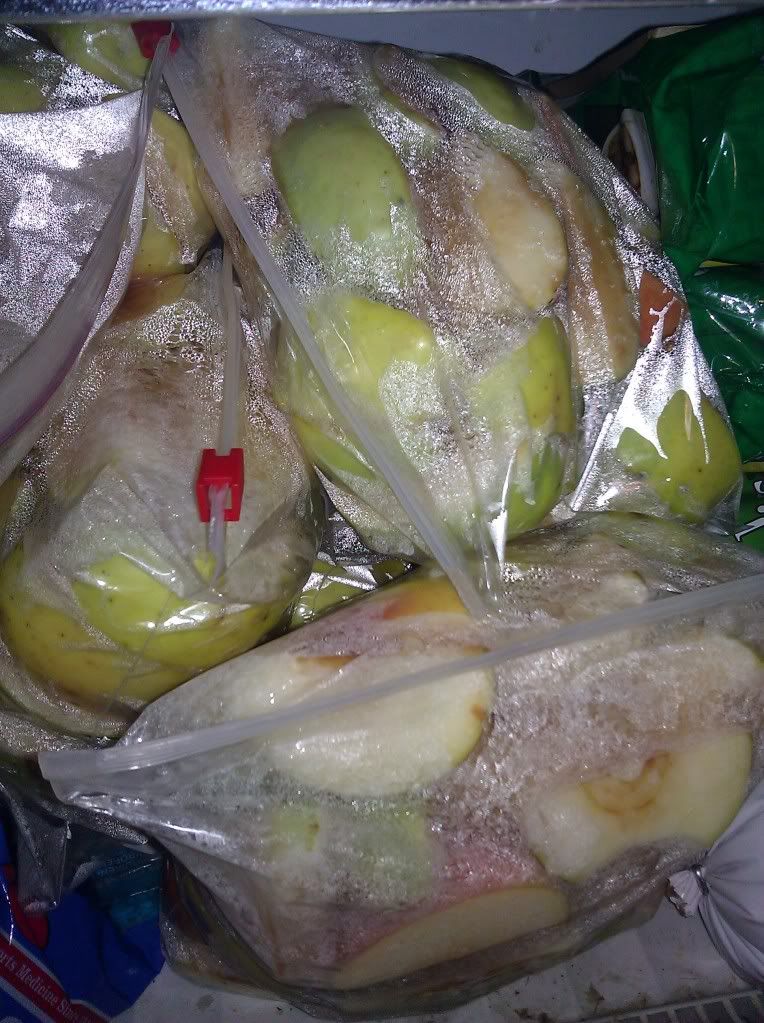
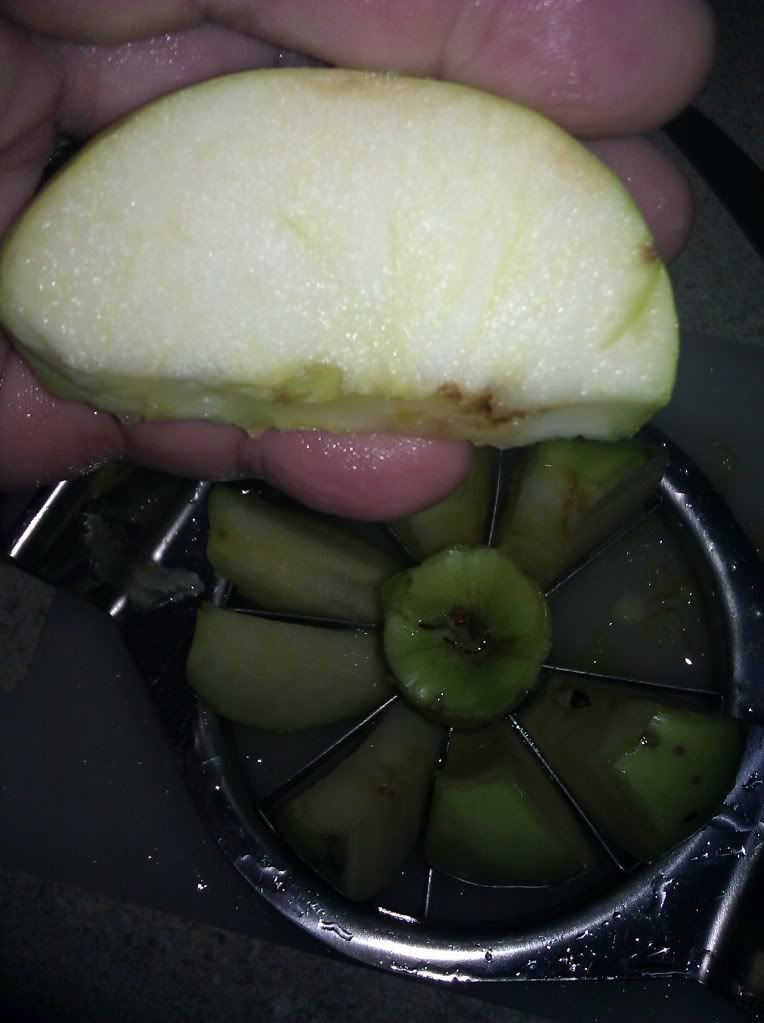 I took a picture, but sadly, the specks of oddness don't appear to be showing up very well. I ended up getting about 4, 1 quart ziplock bags and a bit extra cored and stuffed in the freezer. Freezing the fruit will break down the cell walls and allow me to extract more juice once pressing time comes. Miss Chelsea and I are investing in an antique fruit press/sausage stuffer, which I should be able to use to press the juice out of these apples once my primary fermenter is empty again.
The description on these lovelies per the orchard is as follows:
Calville Blanc d'Hiver (1598) Antique variety from France, where it was grown in the king's gardens at Orleans; one of the premier gourmet apples, still served for dessert in the finer Parisian restaurants; tart, strong, distinctive flavor
Wednesday, November 2, 2011
I know! Let's make a tent!
As you know, I never have enough to do in my copious spare time as a new mother. Thus, I'll be making myself a new bedouin style tent for local camping. The reasons (And following that, design specs...) I am setting aside my pavilion are as follows:
That's how I settled on the ouled nail (ooled nayal) bedouin tent design that Elizabeth and Krystal used for their tents. The tent will essentially be a giant rectangular tarp with one 4' long ridge pole supported by two 7' long two by two's and 16, 4' long wall poles. There will also be about 6 front and back door poles of various lengths from about 7' to 4', but I'll figure out those lengths when I "get there."
- It doesn't fit in my car very well with it's 18, 6 foot long poles, weirdly shaped ridge pole, and square center pole.
- I can't put it up by myself.
That's how I settled on the ouled nail (ooled nayal) bedouin tent design that Elizabeth and Krystal used for their tents. The tent will essentially be a giant rectangular tarp with one 4' long ridge pole supported by two 7' long two by two's and 16, 4' long wall poles. There will also be about 6 front and back door poles of various lengths from about 7' to 4', but I'll figure out those lengths when I "get there."
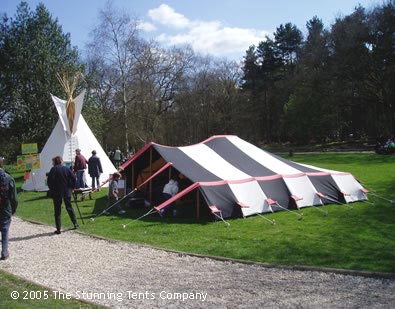
Above is an example of an ouled nail style tent. I intend to have similar striping in my canvas, only my stripes will be alternating white and pumpkin colored, and the pumpkin color will also be used for the tension bands (triga) that you see on the example tent in red.
Last night I cut my pumpkin colored sunforger. (I think they refer to this color as "khaki," but srsly... it's pumpkin.) I have the following pieces:
- 3, 28"x330" tent panels.
- 1, 12"x268" central triga band
- 2, 8"x268" wall triga bands
- 4, 12"x36" false triga bands
- 12, 8"x15" stake bands (every wall seam)
- 4, 4"x15" stake bands (outer edge)
I've held off on cutting the stake bands to length until the artwork that I've commissioned for this tent is delivered. Once I have it, I'll be able to figure out how long I really want my stake bands to be to fasten it to the tent securely, center the art, and have enough band left to attach the dowel at the bottom of the stake band.
Tuesday, November 1, 2011
Columella and Markham Cheese Process in My Own Modern Shorthand:
Columella Process
•After curd formation transfer curd into baskets to remove whey. (Similar to brie/camembert draining process.) Once sufficient whey has been extracted to make the curd more solid, press under weight.
•Remove from molds and rub with salt. Let rest overnight.
•Press under more weight.
•Rub with more salt.
•Press under more weight.
•After 9 days, rinse thoroughly with warm water.
•Age.
Markham Process
•After curd formation stir “well” and “diversely.”
•Press curd to the bottom of the pan and remove as much whey as possible from the top. (Similar to Gouda curd mat formation.)
•Press curd into the mold, breaking up the curd mat with hands as you go. Press under a small amount of weight for a couple hours.
•Turn out curd onto a wet cloth and press under a greater weight for a half hour.
•Flip cheese into a dry cloth and press under a greater weight for 24 hours, changing the cloth 5-6 times for a new dry cloth.
•Press for 24 hours.
•Press for 12 hours with no cloth
•Rub with salt. And let it rest for 24 hours.
•Wipe down with a clean cloth, rub with salt, flip and let it rest for 24 hours.
•Rub down daily with a clean cloth and keep an eye on it to make sure it doesn’t dry out too fast.
Monday, October 31, 2011
Plan, based on period cheese making techniques, and Lancashire legend:
So here's my initial plan for a peri-oid cheddar. According to legend, Lancashire cheese was produced in small batches of curd over a period of days. Early on, they were just using "left over" milk to produce cheese, so they didn't have enough curd each day to produce a single cheese. So the left over milk each night was turned into curd, and then after 2-3 days, the accumulated curd was combined into a single cheese and pressed. Based on my reading of the two previously displayed sources, this will work out for me because they didn't seem to be heating the curd after the cutting phase, thus a lot of whey would be left in the curd. Because they're also not salting the curd, the whey will have even more reason to stay in the curd. Thus, leaving the curd to drain over night in a basket will give me the dryer curd that I want, while not utilizing any "new" techniques. Additionally, from my reading, it looks like the curd pressing in both descriptions took DAYS. So my curd accumulation process shouldn't deviate in an unheard of way from the known-to-me "traditional" methods. The one "uneasy" spot for me here is that I haven't seen anything about milling curd in period literature.
I think this will be something that I will try out during the work week, and then on the weekend, I'll try doing a straight up 3 lb batch where all the curd is pressed as a single group, rather than staggered.
Sunday, October 30, 2011
The way of salting and pressing cheese:
Below, I have included the text of two different descriptions of hard cheese making. The first is from the first century AD, by a Roman author (Columella) and the second is from the sixteenth century in England (Markham). Very little has changed. With modern cheese making, we add the salt directly to the curds before pressing. Pressing cheese is usually less than a 24 hour affair and then the cheese is off to age. In both of the descriptions from period (and before) you can see that the salt is added during the pressing process, and it is applied to the outside of the cheese as a rub. The added technology in the later description, is the use of cloths to wrap the cheese within the press. (The cheese cloth wicks whey away from the surface of the cheese thus drying it out faster.) Torquatto Tasso, also writing on cheese in the sixteenth century maintained that the cheese must be turned into a new, clean cloth at least 3-4 times in the first day. And if you do not use fine clean linen cloth the cheese will be as a child that has been sitting in a wet diaper too long. How's that for appetizing imagery?
But the milk-tub, when it is filled with milk, ought not to beDe Re Rustica (Columella)
without fome gentle warmth. Nevertheless, it muft not be brought
fo near as to touch the flames, as fome people are of opinion, but be
placed not far from the fire, and prefently after it is curdled, the liquor
muft be transferred into wicker-bafkets, cheefe-vats, or moulds; for
h is of great importance, that the whey be ftrained and feparated from
the condenfed fubftance as foon as poflible: for which reafon, the
country-people do not indeed fuffer the moifture to drop flowly from
it of its own accord; but, when the cheefe becomes a little more folid,
they put weights upon it, that thereby the whey may be fqueezed out r
then, as it is taken out of the moulds or frails, it is laid up in a dark
and cold place, upon the very cleaneft boards, that it may/ not be
fpoiled; and it is fprinkled with bruifed fait, that it may fweat out
the acid liquor: and when it is hardened, it is prefled more vehe-
mently, that it may be confpiflated; and it is fpiinkled again with
toafted fait, and condenfed again with weights. After this has been
done for nine days, it is warned throughly with fweet water, and
placed in fuch a manner under a {hade, upon hurdles made for that
purpofe, that one eheefe may not touch another, and that i.t may be
moderately dried. Then, that it may keep the tenderer, they put it
clofe together in feveral ftories, in a clofe place, not expofed to the
winds. Thus it neither becomes fpongy and full of holes, nor fait,
nor dry t the firft of which faults ufes to happen, if it be prefled but a,
little i the fecond, if it be feafoned with too much fait; and the third,
if it be fcorched in the fun. This kind of eheefe may be exported alfo
beyond fea. For that which is defigned to be eaten in a few days,
while it is new, is made up with lefs care : for, being taken out of the
wicker bafkets, it is put into fait and brine, and foon afterwards dried
a little in the fun.
To make a new milke or morning milk cheese, which is the best Cheese made ordinarily in our kingdome; you shall take your milk early in the morning as it comes from the Cow, and file it into a cleane tubbe, then take all the creame also from the milke you milk the euening before, and straine it into your new milke; then take a pretty quantity of cleane water, and hauing made it scalding hot, powre it into the milke also to scauld the creame and it together, then let it stand, and coole it with a dish rill it be-no more then luke warme; then go to the pot where your 187 earning bagges hangs, and draw from thence so much of the earning without stirring of the bagge, as will serue for your proportion of milke, and straine it therein very carefully; for if the least mote of the curd of the earning fall into the cheese, it will make the Cheese rot and mould; when your earnings is put in you shall couer the mike, and so let it stand halfe an howre or thereabouts; for if the earning be good it will come in that space; but if you see it doth not, then you shall put in more: being come, you shall with a dish in your hand breake and mash the curd together, possing and turning it about diuersly: which done, with the flat palms of your hands very gently presse the curd downe into the bottome of the tub, then with a thinne dish take the whey from it as cleane as you can, and so hauing prepared your Cheese-fat answerable to the proportion of your curd, with both your hands ioined together, put your curd therein and breake it and presse it downe hard into the fat till you hane fild it; then lay vpon the top of the curd your flat cheese-boord, and a little small weight thereupon, that the whey may drop from it into the vnder vessell; when it hath done dropping take a large cheese-cloth, and hauing wet it in the cold water lay it on the cheese-boord, and then turne the cheese vpon it; then lay the cloth into the cheese fat; and so put the cheese therein againe, and with a thin slice thrust the same down close on euery side; then laying the cloth also ouer the top to lay on the cheese-boord, and so carry it to your great presse, and there presse it vnder a sufficient waight; after it hath been there prest halfe an howre, you shall take it and turne it into a drie cloth, and put it into the presse againe, and thus you shall turne it into drie cloathes at least fiue or sixe times in the first day, and euer put it vnder the presse againe, not taking it therefrom till the next day in 178 the euening at soonest, and the last time, it is turned you shall turne it into the dry fat without any cloth at all.The English Huswife (Markham, Gervase)
When it is prest sufficiently and taken from the fat, you shall then lay it in a kimnell, and rub it first on the one side and then on the other with salt, and so let it lie all that night, then the next morning, you shall doe the like again and so turne it vpon the brine, which comes from the salt two or three dayes or more, according to the bignesse of the cheese, and then lay it vpon a faire table or shelfe to drie, forgetting not euery day once to rubbe it all ouer with a cleane cloth, and then to turne it till such time that it be throughly drie and fit to goe into the presse; and in this manner of drying you must obserue to lay it first where it may drie hastily, and after where it may drie at more leasure; thus may you make the best and most principall cheese.
Sunday, May 29, 2011
Dear Doggie: PLEASE TO NOT FEED TEH BEBE TOADS. KTHKSBAI.
It has been raining all day. My dogs do not like rain – and yet… They still must potty. I have been a mean, mean Momma and made them all go outside twice today, but *certain dogs* have been reluctant to poop … Apparently, getting rained on is so distracting that the poopy process is interrupted and impossible to perform.
Those same certain dogs that do not want to poop outside in the rain, are sometimes sneaky. They creep into my basement to poop in the laundry room when it is raining outside. So it is vital that I leave the basement door CLOSED when it is raining outside. Just in case.
Today, I forgot to close the basement door after coming up with a load of clean diapers. Maggie dashed into the basement while my hands were full and I thought for SURE that I was going to have to clean up a “present” as soon as I was able to safely put the baby and all the clean laundry down. Before I could get my cleaning tools together, though, Maggie came back out of the basement. She didn’t look as guilty as she usually does after leaving “presents” for me in the basement… She did, however, look… funny.
Moodles ran to Maggie for their normal joyous reunion, after being apart for longer than 30 seconds. Maggie spat out a live toad on Moodle’s foot… Apparently having a live toad in one’s mouth leads to a very peculiar expression on a dog. Maggie had brought Moodles a present of a different sort… A slimy toad! Hooray! (Normally, I’d correct a person for describing a toad as being “slimy,” because they generally have dry skin… This one, poor thing, was completely coated in dog drool. ) Moodles managed to snatch it up off the floor before it was re-oriented enough to get away… Seeing as it had been good enough for Maggie to eat, Moodles thought that CLEARLY the offering was meant to be food - forgetting that Maggie doesn’t have proper hands for sharing. Moodles nearly put the toad in her mouth, but paused to look at me with her “mischief face,” just to make sure she was allowed. (She gives me the mischief face right before she tries to eat dog food. She knows I’m going to stop her every time, but apparently the fun is in the trying…) As usual, I was the wet blanket and took the toad away. I put it on the floor to see if it was still alive enough to be worth putting outside. Miraculously, I managed to hold back the curious tide of dogs and toddlers who aren’t as clear on the finer points of “personal space,” as I and the toad might have liked them to be. Surprisingly, the toad seemed stunned, but otherwise uninjured. After a few seconds of re-orienting, it made for the privacy of the space under the refrigerator. Moodles thought it was FANTASTIC and shrieked with glee. She lunged for it a couple times, but was knocked out of the way by Maggie who, ever the helpful one, thought I might require assistance in corralling her find. I took the poor little toad outside before his life got any more exciting.
I still have no idea how that toad ended up in our laundry room. I guess now he knows better than to come into THIS house to get out of the rain.
Sunday, May 22, 2011
Moodles goes to the zoo:
Aunty Jocelyn took Moodles to the Zoo! Moodles saw all the animals she looks at every night on her light mobile, except for the hippo and the pelican. Sadly, Moodles was more excited to see other kids up close at the zoo, than she was about the animals. (I agree. Toddlers totally need to be kept in the zoo... But really, I think the problem was that most of the animals were too far away for Moodles to understand what I was pointing at. The other children, on the other hand, were RIGHT THERE, and in many cases, screaming louder and flinging more poo than the monkies.)
The carousel was not a hit. It was pretty until it started up, but then EVERYTHING WAS MOVING and Moodles wanted off. Maybe next year.
The one "doggie" that Moodles did like was the red panda. (All animals are still doggies, as far as she's concerned.) It came right up to the fence where Moodles could see it closely. Up close, it still looks like a stuffed animal. In the gift shop, I showed Moodles a stuffed red panda that chitters when you squeeze it. Moodles grabbed it from me, and without hesitation, stuffed it in her mouth and bit the crap out of it.... either she's feral or aunty Eithni told her what to do if Momma doesn't fall for just licking things in the gift shop...
Overall, a good time was had by all. We'll probably hit that attraction again this summer. Thanks, Auntie Jocelyn!


Monday, April 18, 2011
Saddest Little Girl on the Playground
Yesterday was finally a nice day in Wisconsin. Warm enough outside that when Moodles got all crazy and started pouncing in the dogs and jumping on the couch, I decided to take her to the park to let her "get it out of her system." It was the saddest thing ever.
My child needs practice going to the park. There seem to have been two main issues. Item the first: Moodles does not enjoy wearing shoes, and because she has such chubby feet, I've had trouble getting shoes in her size that will go on her feet. Thus, up until recently, I've not been terribly good about putting shoes on her, and when I do, she either takes them off immediately or sits around forlornly, giving me dirty looks suggesting that I have crippled her with horrifyingly complex torture devices. Item the second: When Moodles finds a rock in the house, she tries to eat it. Being a reasonably responsible parent, I do not let her, and usually make her give me the rock so that I can dispose of it. Thus, when we went to the park, it was not the frenzy of running, flailing, and gravel tossing I had envisioned. My poor child. First I put SHOES on her, and then I took her to the park and set her down in a hill of gravel, which was an even more strange surface to be on than in shoes alone. She did not run. She did not smile. She just stood there looking at me for cues.
So I ran away from her and came back, to demonstrate the playfulness that she was supposed to be feeling. She sighed deeply. Then she leaned over and picked up a single particle of gravel and handed it to me. Then another. Then more resounding sighs, as though to say, "Mother. We are NEVER going to get this cleaned up in time to play before bed time."
**facepalm**
After about 10 minutes of unsuccessfully trying to engage Moodles in play that wasn't quite so forlorn or serious, another little girl came to the park to ride the swings. She was about two and screeching with glee every time her Papa gave her an under-dog push. Moodles observed this very seriously, but did not approach. After the little girl left, I put Moodles in the swing to see if maybe she would like that more than the slide. (She seems to have a problem with the slide, wherein no matter which way I put her ON the slide she ends up coming down head first, looking like an unflappable butler going for a ride in the Batmobile. Not panicking. Just... completely unflapped. And up-side-down.) She eventually gave me a giggle for the swing, but other than that the playground was a complete flop.
Obviously we need more practice. We got home and she seemed relieved to be there with her doggies (which she went back to tackling) and her sofa (which she is darn near jumping off of these days.)
**headdesk**
Thursday, April 7, 2011
Better Late than Never

I'm sure some of you who signed up for socks back in February have
noticed that you still have no socks.
I'm no longer working with commercial yarn. I am now SPINNING the yarn
in a vain attempt to de-stash a couple pounds of the raw wool I have
lying around the house... Then, because I like making new friends and
working on collaborative things, I am sending the yarn ALL OVER THE
COUNTRY to be dyed by someone else. THEN, when it comes back to me, I
am making SOCKS. So. These are the socks I made for Gwyneth with yarn dyed in Florida by my
friend Elizabeth. Aren't they pretty?
Tuesday, April 5, 2011
Sign Language: This is not the ASL you're looking for...
So, since it became clear that Moodles understands more words than she can say, I've been trying to teach her some ASL, so she can communicate more things to people other than Mommy, Daddy, and Grandma.
This morning, I was THRILLED because when as soon as she got up, she was signing "milk" at me... or so I thought. I poured her some milk and handed her her sippy, and signed "milk."
She signed back "MILK!" but then threw the sippy on the floor and hit me in the knee.
"No, GENTLE." I told her.
She rolled her eyes and *patted* my knee. Then she *hit* my knee and signed "milk."
"But I gave you milk and you threw it on the floor. Right there."
"Milk." *hit, hit, hit*
"GENTLE."
*sigh, pat, pat* And then she ran off, leaving me to pick up her milk and follow. She went to her book collection and picked out a book and then waited patiently for me to sit down in the reading position. I
sat, and she handed me the book. "Milk."
Oh.... Riiiiight. "Hand, Hand, FINGERS, THUMB. You were showing me FINGERS, THUMB, weren't you? I am sorry, sweety. Your Momma is 'Dum ditty dum ditty dum dum dumb."
**For those of you who are not familiar with the book, it's about a bunch of monkeys with drums. She wasn't hitting me. She was doing the drumming part of the book that we do every time we get to "dum ditty dum ditty dum dum dum."
Friday, April 1, 2011
Hybrid diaper cover tutorial:
So, after months of experimentation, and half a dozen or so diaper cover designs, I've come to a final design that I'm really happy with. It's not so much a specific PATTERN that I like as these techniques will work with MOST of the patterns in my pattern stash. It's the functional elements that I love. So, lets have a look at what I've got:
Sorry I sound all breathy. I accidentally spent an hour and a half listening to JVC after Moodles switched the channel and I was too busy sewing to find where she put the remote and go back to NCIS.
What does this design have that I like? Leg gussets, and front and back slide/splash guards, a wipeable PUL interior, but very little of the rubberized side of the fabric is in contact with the baby's skin, AND front and back elastic to guard against poor fit and poo-splosions.
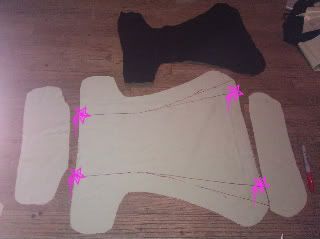
So lets talk about what I did. (I learned these tricks from other ladies. I just figured out a method of combining all these features that works for me.) First I cut out my pieces. I have 1 piece of black flannel cut to the actual shape of the diaper, and 1 large piece of PUL that is traced on the fold, but instead of putting the pattern piece directly against the fold, I put it 2" from the fold, thus giving me 4" of extra PUL for the middle of the diaper. This extra PUL will be used to form the leg gussets. Here I've overlaid my flannel normal sized piece on top of the PUL piece so you can see the extra width I'm talking about.

I also cut pieces of PUL in the NORMAL PATTERN SIZE that duplicat the FRONT and BACK of the diaper to form the splash guards. Here is a picture of all my pieces cut out. You can see those extra front and back pieces in the picture. These extra pieces also provide stiffness in the waistband, and substance for the snaps to grab onto.
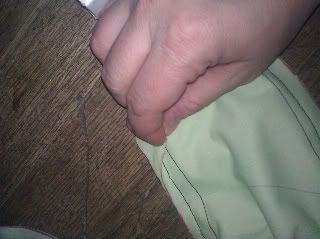
Also in the above picture, you can see that I drew in the elastic lines for the gussets. Normally, I just go 2" from the outside edge of the PUL, but because this pattern (Tighty Whitey Hipster) is hip snapping, my original lines wouldn't work once the gussets were in place... They'd end up interfering with snap placement. So I re-drew my lines, and the ones I used are the ones with fuscha stars on them. The next step was to 3-step zigzag my lastin down along the drawn lines with the lastin and the stitching on the OUTSIDE EDGE of each line. I did my sewing on the non-shiny side of the PUL, since I want the shiny side to be toward the baby for this part. (Remember to stretch the lastin as you sew!) Then, I folded along the lines, I sandwiched the lastin between layers of PUL, and added 1 line of straight stitching along the outside edge of the lastin (not sewing through it) on the shiny side of the PUL. Doing the leg gussets with one straight seam here, will reduce the number of needle punctures through the PUL in the wet zone.
Next, I pinned the extra front and back splash guards to the body of the PUL, shiny sides together. The leg gussets become 1" deep pleats at this point, and I fold the tops of each gusset ridge toward the center of the diaper. Then I stitch the splash guards down with DOUBLE the seam allowance I was using previously. (So if I was using a 1/2" seam allowance before, I do these seams at 1".) This will "seal up" your wet zone like a dam so that other seams that go through the cotton layer won't wick.
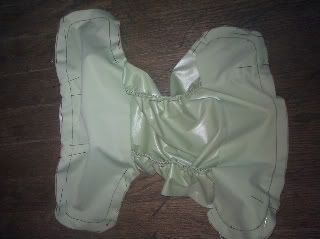
Then, going back to the normal seam allowance, I sew the cotton flannel to the diaper PUL, right sides facing together. The view you see of the PUL in the above picture is the RIGHT SIDE of the PUL part of the diaper. The pink arrow shows the space I left in the seam to turn the diaper right side out after I add my elastic. In this view you can also see how the leg gussets are pleated toward the middle at the front and back of the diaper.
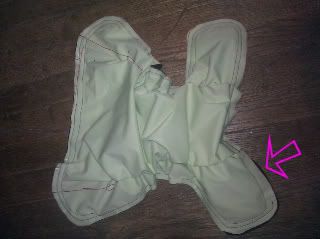
Here is a close up of the two previous seams. You can see how the "dam seam" is toward the inside, and the seam that goes through the cotton fabric is now outside the "wet zone."
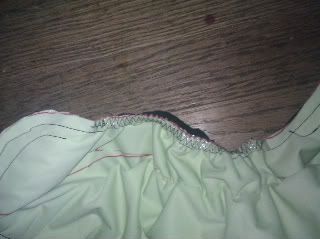
The next step is to sew my lastin to both leg seams, and the back and front stretch zones. I 3-step zig-zag my lastin to the PUL side of the seam allowance, and this causes the elastic to roll IN toward the baby.
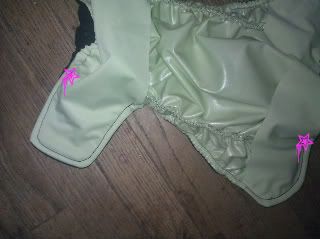
Then I turn and top stitch my diaper. I top stitch from pink star, to pink star in this picture, along the leg seam. Make sure you don't sew through your lastin! In the places where I was sewing along the previously made double width "dam seam," I sewed right through the same line, because I was NOT sewing in the wet zone. I do not top stitch the front and back elastics, because they are in the wet zone. As long as you top stitch the wings on either side, this seam will still look tidy, and if you sewed your lastin to the PUL side of the seam allowance, the seam will roll in.
Then I added my snaps. Since there is a nice PUL splash guard, and I'm not putting my snaps in the wet zone, I can do all my snaps LAST and still have "hidden snaps." I just reach up under the splash guard on the front of the diaper to place my hidden snaps, and the hip snaps in the back go through all layers of fabric.
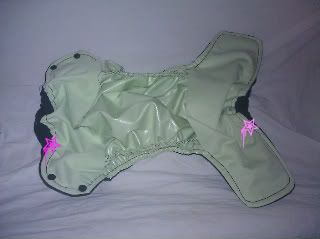
TADA!
Tuesday, March 29, 2011
5:00 AM Pedicures
So, over the weekend, Moodles ripped her toenail. It wasn't a bad rip, but it was scratching the crap out of me every time I picked her up. We normally clip her finger or toenails every weekend, and she's pretty good about staying still so I can do the deed, but the ripped toenail required several sessions of burr nibbling to get everything smoothed out. During these sessions, Moodles evidently figured out what was going on, and decided that SHE TOO, was a TOOL USING MAMMAL. Therefore, her latest form of entertainment is "Giving Mama a Pedicure." What's really cute is that when she gets into it, she murmurs reassurances and praise at me for not wiggling too much, just like I do when I trim HER nails.
I got some still photos of her process yesterday morning, but really wanted to get her murmuring on video... Unfortunately, last night when I was attempting to get video of her "process," she busted me with the camera and decided that kissing Mama was more important than clipping her toenails. (It was near bed time, and there is always a lot more snuggling at bed time, than any other time of day.) Even though I didn't manage to get a recording of what I wanted, the video is still ridiculously cute, so:
Tuesday, March 22, 2011
Monster Butt

Sorry. Long time no post, but I've been spinning of late, and showing you the skeins of string I've been generating didn't seem all that inspiring. These pants, on the other hand? They are worth showing off. How cute are they?!
Sunday, March 13, 2011
Toddlers are not dogs...
So, Moodles and I went to the Childrens' Museum this morning. Her favorite thing in the WHOLE MUSEUM was apparently the stairs. We went up them about eleventy times and then rode the slide down... you'd think she did the stairs for the slide at the end, but she only seemed to tolerate the slide in order to get back to the stairs again. She felt the green steps were worth the price of admission, but Momma is still on the fence about that...
Eventually, I was able to get her to interract with something other than the stairs. There was a pretend garden plot with cloth stuffed-toy vegetables to "plant." Moodles found a chive with little string root hairs and waived it around a bit. She was warming up to some stuffed radishes when a little boy of about 2 came over and started rearranging the things that Moodles had been sorting. I waited for her to bite him or shriek with Moodle-Rage, but she did not. She waited for him to turn his head and then put the tickley end of her chive in his ear. He gave her a VERY dirty look, but didn't stop touching "her" things. She gave him an innocent look and waited for him to turn his head again. When he turned back to the radishes, she stuck the chive in his ear. He gave her more dirty looks. She blinked at him as though nothing had happened. I was laughing too hard to comment on anyone's behavior. The boy looked to me for adult intervention, and Moodles took the opportunity to insert the chive in his OTHER ear. Two more iterations of this without rescue from the evil Moodles and the little boy got disgusted with both of us and left.
"You can't treat little boys like doggies." I warned Moodles, as soon as I got the giggling under control.
"Doggie," agreed Moodles.
Then she took her chive wand for a trip up the stairs.
I suppose we should get more practice interracting with other children....


Monday, March 7, 2011
Where does the poo go?
So... There's this printer that charges the students to print. I've never had to maintain it, and assumed that we were getting re-imbursed somehow for all the paper and toner we put into the thing. Apparently, we are not, and now it doesn't work with the new Windows 7 lab computers. So, I'd like to get rid of it... Only there's no name or phone number on it. No one here remembers how/why it got into the computer lab. So... where is the money going? Limbo with all the print jobs? I called the campus printing people and they INSIST that the printer isn't theirs. ...This isn't my normal sort of mystery. I guess I'll be calling up all the people that worked in this job before I did and hoping they still feel charitable toward the University... or at least me...
Friday, March 4, 2011


Wednesday, March 2, 2011
And then there were two:

So, I went ahead and finished the pair of what I now think of as "Viking Clown Socks." I'm trying to decide if I should just ship them now that they're done, or wait and send them with a slightly more dignified pair... I'm leaning toward getting them out of the house immediately before they infect anything else...
Tuesday, March 1, 2011
Somehow this was so much less silly in my mind...
It's a good thing that the person who will eventually wear it has unquestionable dignity... I couldn't stop giggling for the last 5 rows of knitting...


Monday, February 28, 2011
Day 27 and Day 28: Spinning, Dying, and Knitting

So, on Saturday, I spun up a bunch of white sock yarn, and on Sunday, I dyed a bunch of it OMG BRIGHT YELLOW. And Sunday night/Monday-way-past-bedtime I cranked out a size 9 Lady's sock appropriate for a Vikings Fan.
;-)Day 25 and 26: Birthday Surprise!

I'm late in posting these days because my Mother-In-Law reads these, and days 25 and 26 were her birthday present. BEHOLD! Miss Moodles helping me model socks!
Thursday, February 24, 2011
Day 24: New Diaper Designs and Materials
I didn't get good pictures of the diapers before they were in use, because I was anxious to see if polar fleece would really work as a diaper cover material. And if the new diaper design would fit.
Success! So now we have diaper covers can go in the dryer without delaminating for those emergency laundry days, and a cheaper alternative to polyurithane laminate for construction materials. Plus a new lower profile diaper design to play with. Eeeeeexcellent.


Wednesday, February 23, 2011

Tuesday, February 22, 2011
Day 22: Danielle's Other Sock

The second sock was completed at lunch today and the pair will go home with their excited new owner tonight!
Monday, February 21, 2011
Day 21: A twist of lime
I was planning on finishing the second sock at lunch so that I could present them to my colleague, but I forgot the extra string needed to finish the cuff. :P I have the dumb. She'll have the pair tomorrow. Instead, today, I give you her first sock, AND the Valentine's Day Surprise Socks being modeled. Woo!


Sunday, February 20, 2011
Day 20: -2 Sanity Points
Moodles still needs diaper covers, since the ones at grandma's house are also dying, but I have a day or two to do applique for more stylish diapers. So today, Bebe Cthulhu. Rawr!


Subscribe to:
Posts (Atom)